HOST CODE FOR JULY 2021:-

Friday, 23 March 2018

Eight Days of Sale-A-Bration - Day 8 - Heartfelt Blooms with the Shimmer Ribbon Combo

Welcome to the eighth and final day of a series of posts called Eight Days of Sale-A-Bration, where I have been featuring some of the gorgeous products you can earn when you place a qualifying order from either of our two current catalogues - the 2017/18 Annual Catalogue or the Spring/Summer 2018 Catalogue (see my previous post about SAB for full details).  But you'll need to be quick, as the promotion ends on 31st March 2018!


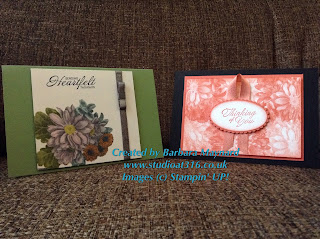
Today's cards feature the Heartfelt Blooms stamp set, the image stamp from which is created using a new process which is awaiting patenting.  It produces a very shallow groove into the red rubber, which allows for much finer detail to be shown in the image, resembling a fine art pencil drawing with amazing shading and highlights.


My first card was CASed from one by Jenny Moors from Stampin' Moments - I changed the colours and altered the measurements, but thanks for the inspiration Jenny.

Now, I was hoping to surprise you today with a video of me making this card - however, this went disastrously wrong!  Hence the delay in publishing this post.  So, instead I have produced written instructions as I have for the other projects in the series.  It wasn't easy trying to describe how I made the stamped panel, which is why I wanted to do the video, so I hope they make sense.  I also used the Calypso Coral Ribbon from the Shimmer Ribbon Combo from the first SAB release.

You can find the instructions by clicking on the 'Print Recipe' link above the supplies list for this card - just scroll to the end of this post.


My second card was CASed from a card by Amanda Bates from The Craft Spa and is made by stamping the image using half strength Memento Tuxedo Black Ink and then coloured using Stampin' Blends.  The combination of the shading from the stamp and using the Dark shade of each Stampin' Blend colour really makes the image pop.  The card is finished with a length of Basic Grey Ribbon from the Shimmer Combo, with a 'squish bow' on top.

I hope you like my final two cards, and have enjoyed the series.  I will be back tomorrow with a Facebook Live look at one of our gorgeous kits from the Spring/Summer 2018 Annual Catalogue, so watch out for that on 'Showcase Saturday'.

As always, if you have a go at these cards, I'd love to see what you create.  Post a photo in the comments below 😉

Happy Stampin'
Babs 


Supplies for the Thinking of You Card


Supplies for the Sending Heartfelt Thoughts Card


Thursday, 22 March 2018

Slight delay with Day 8

My apologies for the delay with day 8 - my surprise went decidedly P-Tong and so I need to write up instructions tomorrow.

Wednesday, 21 March 2018

Eight Days of Sale-A-Bration - Day 7 - Create Your Own Designer Series Paper with Eclectic Expressions

Welcome to the seventh of a series of posts called Eight Days of Sale-A-Bration, where I will be featuring some of the gorgeous products you can earn when you place a qualifying order from either of our two current catalogues - the 2017/18 Annual Catalogue or the Spring/Summer 2018 Catalogue (see my previous post about SAB for full details).  But you'll need to be quick, as the promotion ends on 31st March 2018!


The two cards I'm showing you today are both made using the Eclectic Expressions Stamps from the 2018 Sale-A-Bration 2nd Release and is a Level 1 item.  Stampin' UP! has some gorgeous Designer Series Papers, but what happens when you want a background in colours not available in the DSP range?  That's easy ... make your own!


The 'Happy Birthday' card has been made using the Eclectic Expressions Stamps and four inks from the soon-to-be-retired In Color 2016-2017 Range (one of my favourites and one I want to get as much use from before it leaves us for good).  I am looking forward to seeing what colours the new 2018-2020 Range gives us, but more about that in a few weeks time.

Circles are always a popular choice, and these have a faded effect so if you make sure you rotate the stamp as you go, they will look even more random.

Instructions for the 'Dotty Dance Birthday Card' can be found by clicking on the 'Print Recipe' link above the supplies list at the end of the post.

Sadly, Stampin' Up don't sell a DL size envelope to fit this card, but you should be able to get them in any good Craft Shop. Or, you could make one using our 


The Thank You Card has been made using our other current In Color Range, the 2017-2019 with has just over a year to run.  My absolute favourite colour is from this range - Lemon Lime Twist - which I've used on this card.  Which of our current ink colours is your favourite?

I used my Stamp-A-Ma-Jig to help place the 'splats' and 'Thank you' sentiments in just the right place.  At first I thought it was just another gadget I would use once then leave in it's box - how wrong could I have been!  It is possibly one of my most used tools.  Having said that, my Stamparatus should be shipping by the end of this month, and will make this kind of repeated design soooo much easier.  But if that is not in your budget, then the Stamp-A-Ma-Jig is definitely money well spent.

I love having randomly stamped borders around the edges of a card insert - I think it just finishes off the card perfectly, and this one was super easy to do.  No measuring, just stamping off the edges while alternating colours.

You can find the instructions for this card  or by clicking on the 'Print Recipe' link above the supplies list for the 'Thank You Card'.

As always, if you have a go at these cards, I'd love to see what you create - just add a photo in the comments below 😜.

Well, tomorrow is the last day of this Eight Days of Sale-A-Bration series and I have a surprise in store, so make sure you come back from 6pm (UK time) to see what my final projects are.

Happy Stampin'
Babs 😘


Supplies needed for the 'Dotty Dance Birthday Card'


Supplies needed for the Thank You Card


My WHY For Joining Stampin' UP!

 At our On-Stage events, we are often reminded to think back and remember WHY we joined Stampin' Up!  So, I thought I'd let you guys...